Recent Activity:
The recent activity log will (in real-time) update as activity occurs on any of your running projects. The log contains hot links that will take you directly to the event (in whatever project it occurred in), allowing you to track your projects easily. Users can amend their preferences to specify what activity they want to appear in their activity log.
For more information on the Recent Activity Log click here.
Events Notifications Popup (not shown in video):
Alongside the activity log, the event notification alerts will visually appear next to any projects as they get updated with activity. The number inside the red dot indicates how many notifications for the project.
Recently Accessed Projects:
Project List
The 15 most recent projects that have had any activity will appear in a list, each with live links that will take the user into the specific project dashboard.
Columns
By clicking on the cog, each user can display the columns they wish to see in the dashboard (this is the same on every dashboard). Once the user has selected the columns they want to see, they can then re-order the columns by dragging and dropping them into the order they prefer (as shown in the video). When the user logs out of Aproove WM the column display is stored inside the site cookies, so therefore when the user logs back in, the display settings will remain (unless they clear the cookies).
Filters
The filters appear as a drop-down list, and the filters are unique to each dashboard. Select your desired filter to display the relevant projects.
Every individual project inside Aproove WM gets its own unique dashboard. This dashboard gives a detailed view of the project's setup, progress, steps, files, and history.
The Dashboard View has four different views within it:
The view that individual users are in when they exit the project dashboard is the view which they will return to when they click on any other project view. Eg. If you exit the project dashboard in the proof view, you will return in this view the next project you open.
Below we will look at the Dashboard, Proof, File, and Workflow views.
Dashboard View
Video below shows the header and side menu.
Dashboard View Side menu
Dashboard Selection:
Switch between Dashboard, Proof, Files, and Workflow (not shown) views.
Project Details:
Project Details information button allows you to see the project technical information, and it also contains a metadata tab that will display any metadata that has been associated with the project.
Thumbnail:
If you have files inside your project, a thumbnail will display. By clicking on the thumbnail, you will be taken to the flatplan where you can see all the files that are part of the project.
Aproove / Reject
Project Aproove or Reject button. This will only show if you have permissions and can be hidden if you do not want the ability to approve or reject a project from the dashboard.
Aproove / Reject
Project Creation Date and Deadline Date. Click on the deadline date if you wish to change it (only shows if you have permissions).
Project Users
Lists all the users who are involved in the project along, with the role assigned to them.
Guest Users
Lists any guest users that have been added to the project. Also has a quick link to add a new guest user/s.
Dashboard View Header menu
Add Proofs
Quick link to add additional proofs into your project
Edit Project and Workflow
Quick link to view your workflow and make any amendments (only available if the workflow was set up using the project creation wizard)
Task view or Workflow view
Switch between Task View which will display all the active and complete tasks in the project or Workflow view which will show all the workflow steps in the project and any active or complete tasks in the workflow steps (please note these views do not display tasks that have not yet been activated)
Task in progress filters
These filters give a visual overview of all the tasks currently running inside the specific project. The tasks are color-coded into different categories so that the user can quickly identify tasks that are; Late, At Risk, On-Time, or Done. By clicking on any of the task categories, e.g., "late" the late tasks will be filtered and display in your task or workflow view (whichever you have selected). This view can be extended to show the donut wheel if you want a more graphical representation.
Proofs filters
Detailed overview of how the proofs within the project are progressing. The color-coded filters indicators show how many proofs have been; Approved, Annotated, Rejected, or have no status. By clicking on the filters, you will be taken to the project flatplan where the proofs in the selected status will display.
Project info (only displays when you expand the view)
Shows the deadline, number of notes applied on the proofs, amount of files in the project, and the amount of space the project is taking on the Aproove Drive.
Dashboard View
Video below shows the main dashboard work area.
Dashboard View Work Area
Task view or Workflow view
The user can switch between the "Task View" which will display all the active and complete tasks in the project, or "Workflow View" which will show all the workflow steps in the project and any active or complete tasks in the workflow steps. (Please note these views do not display tasks that have not yet been activated, e.g., in the Final Check stage in the video, you will see no tasks for that step as the Legal Review step has not yet finished).
Instant Share
The Instant Share button allows a user to instantly invite another team member or guest into the project without having to go back to the project configuration. The instant share pop-up allows the users to select the task or function required of the invited user or guest (click here for more info on instant share)
Recent Activity
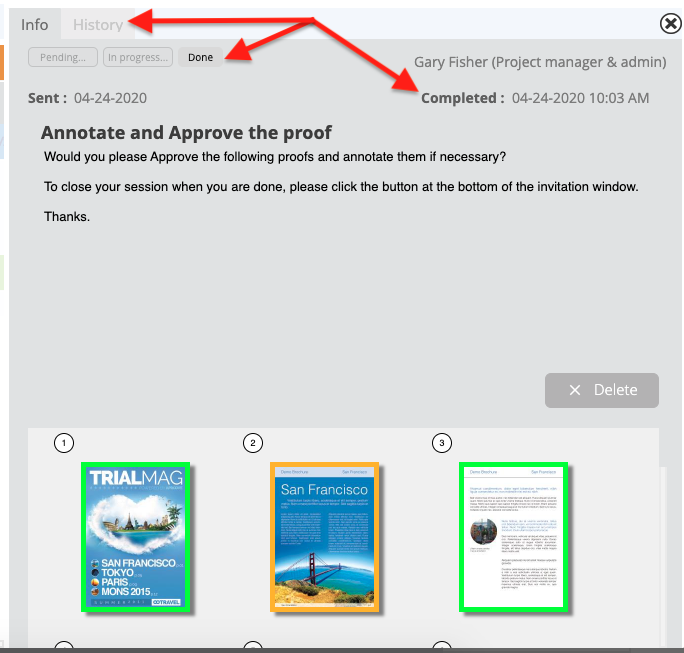
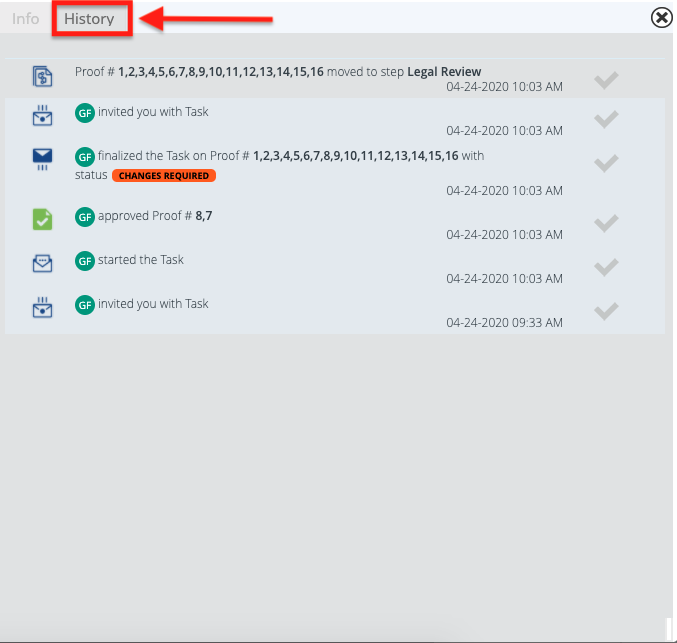
The recent activity shows in real-time any activity inside the project with hot links to the activity being logged. When you click on any specific task in either the task or workflow view, the Recent Activity window will then show the activity specific to the task you selected.
Clicking on a task in the Task or Workflow View
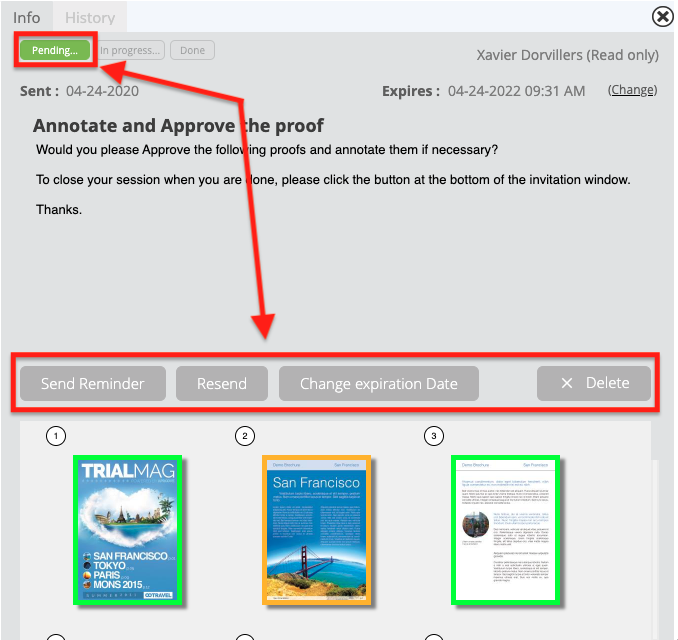
The task and workflow views will display tasks that are complete or active.
Proof View
Video below shows proof view navigation;
Proof View Navigation
The Proof View allows the user to see a more traditional production view of all the proofs within the project vs. the business view in Dashboard View. All the proofs within the project will be listed, and each proof will show its current status and version number.
Select Proof
Use the tick box next to the proof preview to select a proof
Selected Proof Options
When a proof is selected various options become available;
Select proof dropdown/search
If your project has many proofs, the user can search or use the dropdown menu to find the desired proof quickly.
Thumbnail, Progression, and Avatars
Each proof displays the following;
Quick Links
Each proof has quick links to;
Proof View - Creating Versions (See video below)
The Proof View offers two ways to add new proofs or a new version of an existing proof.
The Proof View will display the versions numbers as illustrated below along the top of each proof. You also have a shortcut button to compare versions, which will take you to the comparison view inside the proof viewer.
If you are on the enterprise edition and you have set up sections, you are also able to filter your proofs by sections, as illustrated below.

File View (See Aproove Drive)
Video shows the file view;
The File View displays any files that are within your project; this could be a mixture of proof files or non-proof files. The files will display the folder location (where they are stored) along with the owner, creation date, and size.
Any files in this area automatically get a preview generated, which will be displayed when you hover above the file. The Files area can store anything you want inside the project even if they are not proofs.
Conveniently you can also tick any of the files, and it will allow you to share, delete, rename, or even convert a file into a proof. You can also create a folder structure within the files area.
For a more detailed description of the files area, please view the Aproove Drive section.
Workflow View (See Workflow Builder)
Video shows the workflow view;
The Workflow view will only show for Enterprise Customers who's administrator has setup bespoke workflows using the Workflow Builder Tool.
The Workflow view is beneficial for users who want to visually see the workflow steps and see where all the current tasks and proofs are within the workflow.
The Workflow View is interactive and updated in real-time. You will see any active tasks or proofs shown on any of the steps, and you can click on any other steps in the workflow to view the history of that step during the project lifecycle.
Show History
On all of the steps, the show history button will appear. If you click this, it will display the tasks which have moved through the selected step. This is great if you want to see what happened at a specific step.
Active Step
Any step that has an active task or proof will show a white box with the number of tasks or proofs currently active in that step. The tasks will show who is assigned and the deadline etc. When you click on the step, you will see all the active and complete tasks. You can also click on the show history button to display other tasks that went through that step previously, e.g., you may have 2/3 rounds of proof corrections and want to know the history from the previous round.
Play button
If you have permissions, the play button will allow you to move the project to any previous or future step in the workflow.
Add Guest
If you wish to add a guest to an active or future step in the workflow, you can do this from within the workflow view. (See instant share)
Change Task Expiration Date
Click on any of the open tasks, and you will see the option to extend the task expiration date.
My Project Dashboard allows a user to see all the projects that they created or are part of.
This consolidated view is especially useful to track the progress of all ongoing projects. Visual indicators and filters make it very easy to check the status of your ongoing projects.
My Projects contains:
Search Bar:
The handy search bar allows you to search across your "to-do" list
Auto Refresh:
Having auto-refresh enabled will ensure any new tasks assigned to you (while you are active in your "to-do" list) will automatically display by refreshing your screen. If you do not wish for your "to-do" list to refresh automatically as new tasks get assigned to you, then untick this option.
Filters:
Use the filters to organize your task list per your requirements. Aproove Work Management frequently add additional filters as per client requests.
Columns:
By clicking on the cog, each user can display the columns they wish to see in the dashboard (this is the same on every dashboard). Once the user has selected the columns they want to see, they can then re-order the columns by dragging and dropping them into the order they prefer (as shown in the video). When the user logs out of Aproove WM the column display is stored inside the site cookies, so therefore when the user logs back in, the display settings will remain (unless they clear the cookies).
You will even see custom metadata and have the ability to display it in your dashboard if it has been set up and made available by the administrator. (Click here for more details)
The most popular columns to display are the Task status and Proof status. Both status views are color-coded to instantly see the health of a project and a summary of what stage tasks and proofs currently are.
The "To Do" list was designed to make your team members' life more comfortable by collating all the tasks personally assigned to them into one dashboard list.
It can be easy to lose track of the automated emails that task the users to do something. Users can refer to their own unique "To Do" list to see a comprehensive list and consolidated list of all the tasks assigned to them. Users can also configure the dashboard to display the information that is important to them in the order they want to see it. This allows users to filter and work through the task assigned to them smoothly and efficiently.
The "To Do" List Header Bar: (See video above)
Incoming Tasks Donut:
The task donut is color-coded to identify all the tasks that are; Late, At Risk, On-Time, or Done. By clicking on any of the task statuses, the list will filter only those tasks. These tasks are specific to you only.
Unassigned Tasks Donut:
The unassigned tasks donut only displays if you are part of a "team" that has a shared "to-do" list. These tasks are unassigned until a team member assigns the task. This donut shows any tasks that are active but have not yet been assigned to anyone in your team.
Search Bar:
The handy search bar allows you to search across your "to-do" list
Auto Refresh:
Having auto-refresh enabled will ensure any new tasks assigned to you (while you are active in your "to-do" list) will automatically display by refreshing your screen. If you do not wish for your "to-do" list to refresh automatically as new tasks get assigned to you, then untick this option.
Discard task on completion:
If this option is switched on, any tasks you complete will automatically get removed from your to-do list. If you untick this option, completed tasks will remain in your list and get highlighted with a grey panel.
Recent Activity: (only displays if you expand the header bar as per the video below)
The Recent Activity shows all your previous activity alongside any activity you were mentioned in or tasked. By clicking on any recent activity, you will be taken directly to the specific activity. (Click here for more details)
Tasks Received: (See video above)
Tasks Received:
The Tasks Received area is a list of all the tasks assigned to the user. The user can click on a task and start working on it; once the task is complete, it will go grey in the list or disappear depending on the user's discard task on completion preferences.
Filters:
Use the filters to organize your task list per your requirements. Aproove Work Management frequently add additional filters as per client requests.
Columns:
By clicking on the cog, each user can display the columns they wish to see in the dashboard (this is the same on every dashboard). Once the user has selected the columns they want to see, they can then re-order the columns by dragging and dropping them into the order they prefer (as shown in the video). When the user logs out of Aproove WM the column display is stored inside the site cookies, so therefore when the user logs back in, the display settings will remain (unless they clear the cookies).
You will even see custom metadata and have the ability to display it in your dashboard if it has been set up and made available by the administrator. (Click here for more details)
The Team "To Do" List is unique to Aproove Work Management and enables tasks to get assigned to a department or team of users.
Many companies have departments such as legal, merchandise, and buyers, or perhaps in the case of an agency, it could be a retouching or creative team.
Aproove added the Team "to do" list so that tasks could get assigned to a team or department rather than an individual.
When a task gets assigned to a team, it will appear in the "to do" list of all the users in the team, and it will have an "unassigned" label. The task can then get assigned to a user in one of two ways;
It can be self-assigned by a team member
It can be assigned by a manager (who has permissions) to anyone in the team
Once the task gets assigned, it will disappear from the team "to do" list and show up in the assignee's personal "to do" list. The other team members will no longer see the task as it has been assigned.
A manager is able to re-assign a task to another user or "unassign" the task back to the team "to do" list, which can be useful if, for example, a user is out sick or on vacation.
Optionally, you can automatically reassign a task back to the user it was assigned to, should the task appear again in the workflow. For example, a proof gets a new revision, and you want the designer that worked on it initially to carry out the corrections; otherwise, the task will just show up as unassigned for any team member to pick up.
The Team "to do" list is handy when you have multiple people in a team that can all carry out a task, but any one of them can do it.